User Guide

Dash is a personal planner app which offers unparalleled speed using text-based input. It supports both management of tasks and contacts. Dash is tailored to the needs of university students, who must keep track of a slew of different deadlines, commitments, and contacts. So long as you’re a fast typist, Dash provides a blisteringly quick way to stay on top of your responsibilities.
This guide was written to help you set up and start using Dash. You can navigate by clicking the table of contents below. If you’re a new user, the Quick Start guide has all you need to get started. If you’re an intermediate user looking to get more out of Dash, all supported commands are listed below.
Table of Contents
- Table of Contents
- Setting up Dash
- How to use this User Guide
- Getting Started
-
Features
- General
- Contacts
-
Tasks
- Adding a task:
add - Editing task details:
edit - Tagging a task:
tag - Assigning people to a task:
assign - Completing a task:
complete - Deleting a task:
delete - Finding all tasks matching given details:
find - Viewing all upcoming tasks:
upcoming - Listing all tasks:
list - Clearing completed tasks:
cleardone - Clearing all tasks:
clear
- Adding a task:
- Command summary
Setting up Dash
Whether you’re using Windows or macOS, the steps for installation are the same.
-
Ensure you have Java
11or above installed in your Computer. Not sure what Java is? Click here! -
Download the latest
dash.jarfrom this website. - Copy the file to the folder you want to use as the home folder for Dash, which is where your data is stored.
- We suggest creating a folder called “Dash” and putting the
dash.jarfile inside it. You can place this folder wherever you want. Next, we recommend that you create a shortcut for Dash by right-clicking on thedash.jarfile. On Windows, click on theCreate Shortcutoption while on macOS, click onMake Alias. You can then put this shortcut in a convenient place (such as your Desktop) for easy access.
- We suggest creating a folder called “Dash” and putting the
-
Double-click the file to start the app. Here’s what you should see in a few seconds:
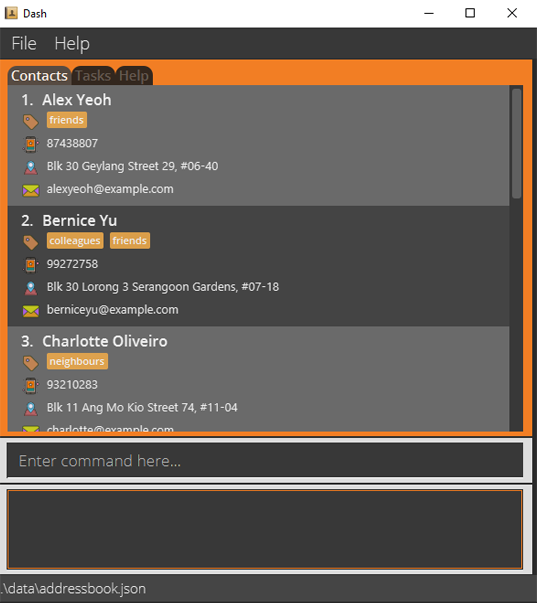
- That’s all you need to do for the setup. To get started writing commands, refer to the Getting Started section below.
How to use this User Guide
- Go to the Getting Started section for an overview of Dash.
- If you want to dive straight into features, you can check out our Features section.
- For a quick recap of the commands, you can take a look at our Command Summary section.
Here is the meaning of some icons used in the guide:
![]() Extra information about the specific section.
Extra information about the specific section.
![]() Important information to help you avoid errors.
Important information to help you avoid errors.
![]() Tips to help you get the most out of Dash.
Tips to help you get the most out of Dash.
Getting Started
Dash supports contact and task management in several ways. In terms of contact management, Dash allows you to add contacts and fill in details such as their phone number, address, and email. It even allows you to group them using tags such as “Neighbour” or “Colleague”, so you can look them up more easily. For task management, Dash allows you to add tasks, tag them, and set deadlines for them. Once you’re done with a task, you can mark it as complete.
Dash uses a tab system to keep your contacts and tasks separate. To view and edit your contact list, you must switch to the contacts tab. Similarly, to view and edit your task list, you must switch to the tasks tab. Finally, the help tab provides you with a quick summary of Dash’s features and how to use them.
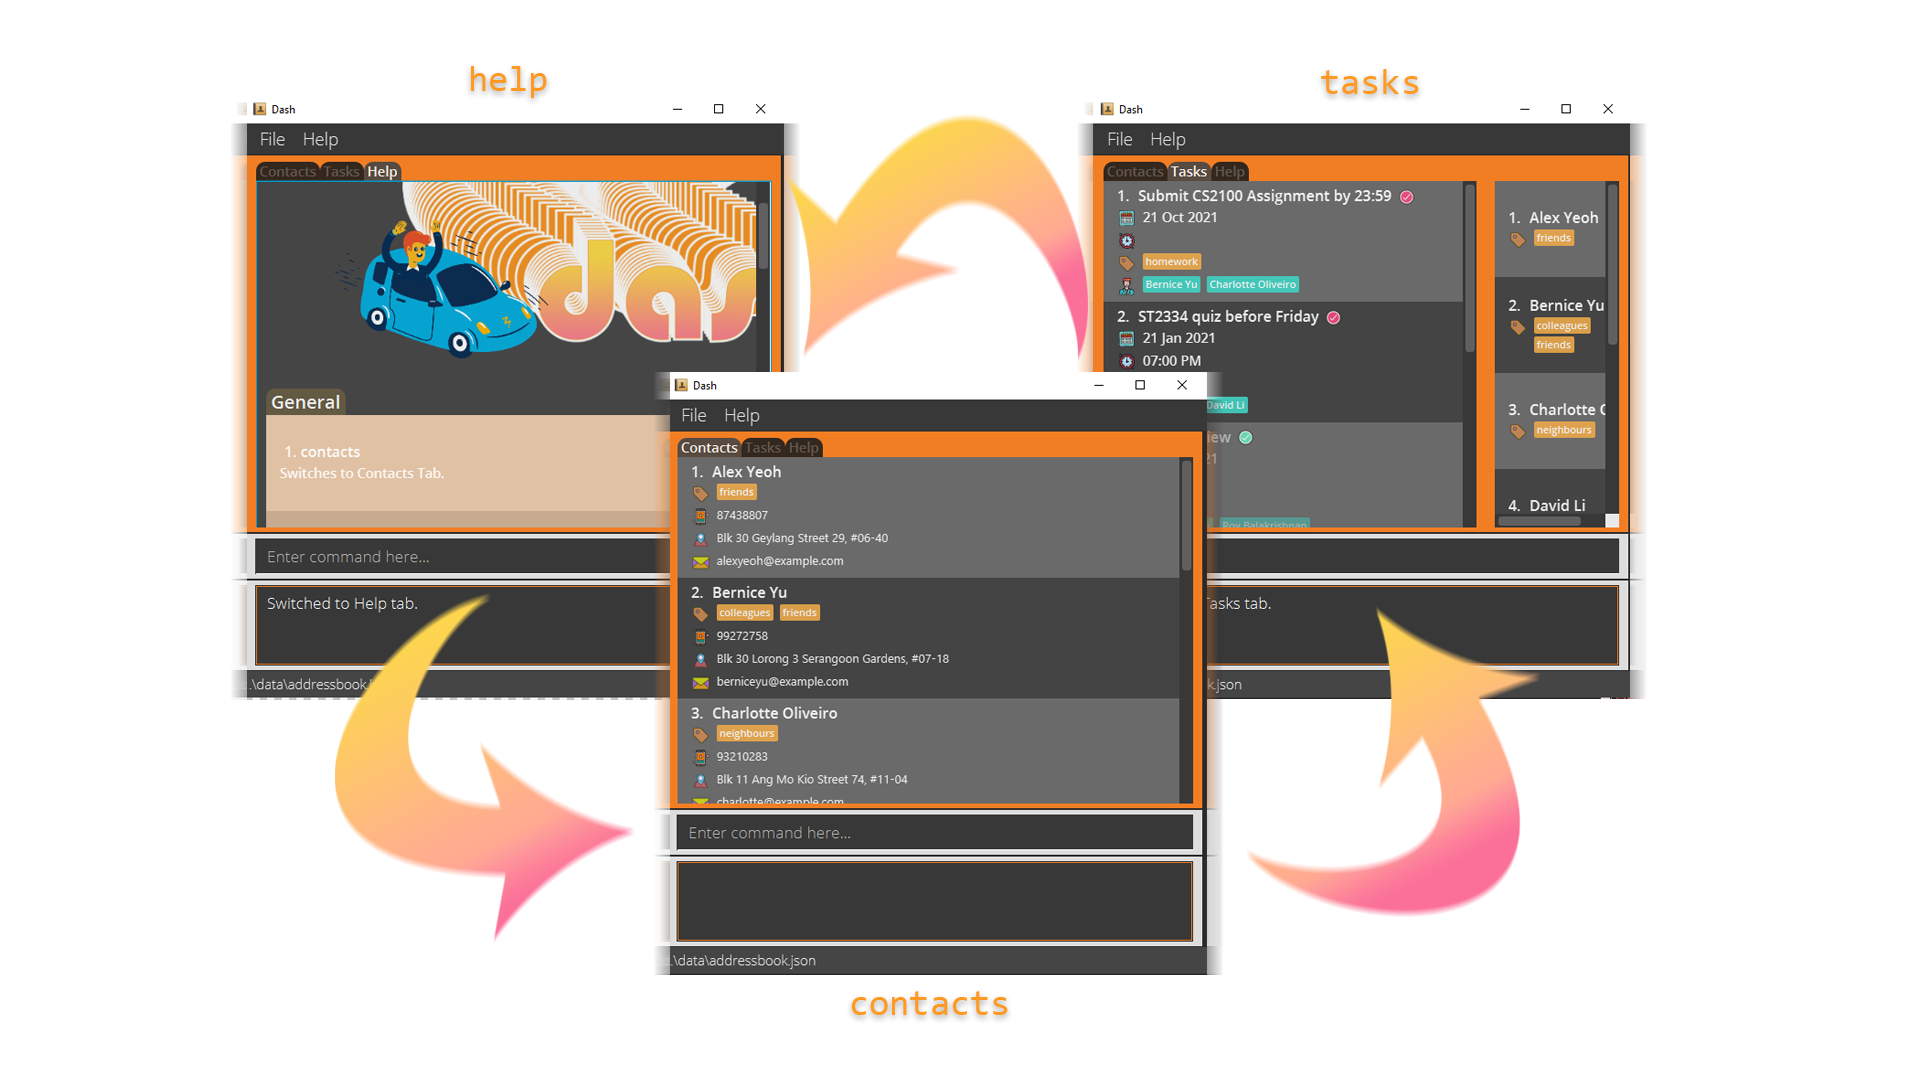
Dash uses a Command Line Interface (CLI) to optimize speed. This means that you use mostly your keyboard to interact with Dash, instead of relying on your mouse to click on options. For example, you can switch tabs by typing in a command; you cannot do so by clicking the tab.
Type the command in the command box and press Enter to execute it. e.g. typing help and pressing Enter will open
the help window.
Some example commands you can try:
-
contacts: Switches to the contacts tab -
tasks: Switches to the tasks tab -
add n/Joe: Adds a contact named Joe. -
clear: Deletes all contacts. -
exit: Exits the app.
![]() You can press the up and down arrow keys in the command box to retrieve your 10 previous commands. This can save
you a lot of time!
You can press the up and down arrow keys in the command box to retrieve your 10 previous commands. This can save
you a lot of time!
Refer to the Features below for details of each command.
Features
![]() Notes about the command format:
Notes about the command format:
-
Command words (like
add,find,help, etc.) are always lowercase and are case-sensitive. e.g.Helpwill not be understood by Dash, buthelpwill. -
Words in
UPPER_CASEare the parameters to be supplied by the user.
e.g. inadd n/NAME,NAMEis a parameter which can be used asadd n/John Doe. -
Items in square brackets are optional.
e.g.n/NAME [t/TAG]can be used asn/John Doe t/friendor asn/John Doe. -
Items with
…after them can be used more than once.
e.g.p/PERSON_INDEX…can be used asp/1,p/1 p/3,p/4 p/5 p/2etc.
e.g.[t/TAG]…can be used ast/friend,t/friend t/familyetc. -
Parameters can be in any order.
e.g. if the command specifiesn/NAME p/PHONE_NUMBER,p/PHONE_NUMBER n/NAMEis also acceptable. -
If a parameter is expected only once in the command, but you specified it multiple times, only the last occurrence of the parameter will be taken.
e.g. if you specifyp/12341234 p/56785678, onlyp/56785678will be taken. -
Extraneous parameters for commands that do not take in parameters (such as
help,contacts,tasksandclear) will be ignored.
e.g. if the command specifieshelp 123, it will be interpreted ashelp.
Here is the meaning of some icons used in this section:
![]() Brief description of what the command does.
Brief description of what the command does.
![]() Explanation of included screenshots.
Explanation of included screenshots.
![]() Format of the command. Refer to the command format notes above for more
information.
Format of the command. Refer to the command format notes above for more
information.
![]() Notes on the command behavior, with relevant examples.
Notes on the command behavior, with relevant examples.
General
Switch Tabs: contacts or tasks or help
![]() If you want to switch to a certain tab, you can do that by typing out the tab name.
If you want to switch to a certain tab, you can do that by typing out the tab name.
![]() Format:
Format: contacts or tasks or help
Alternatively, you can switch tabs using shortcuts to save time:
![]() Format:
Format: c or t or h
Exiting the program: exit
![]() If you want to close the window and exit the program, you can use the Exit command.
If you want to close the window and exit the program, you can use the Exit command.
![]() Format:
Format: exit
![]() You can exit the app at any time by using the exit command or by closing the window. Your progress will always
be saved.
You can exit the app at any time by using the exit command or by closing the window. Your progress will always
be saved.
Contacts
![]() Command behaviour:
Make sure you switch to the Contacts tab before using these commands! They will not work otherwise.
Command behaviour:
Make sure you switch to the Contacts tab before using these commands! They will not work otherwise.
Adding a contact: add
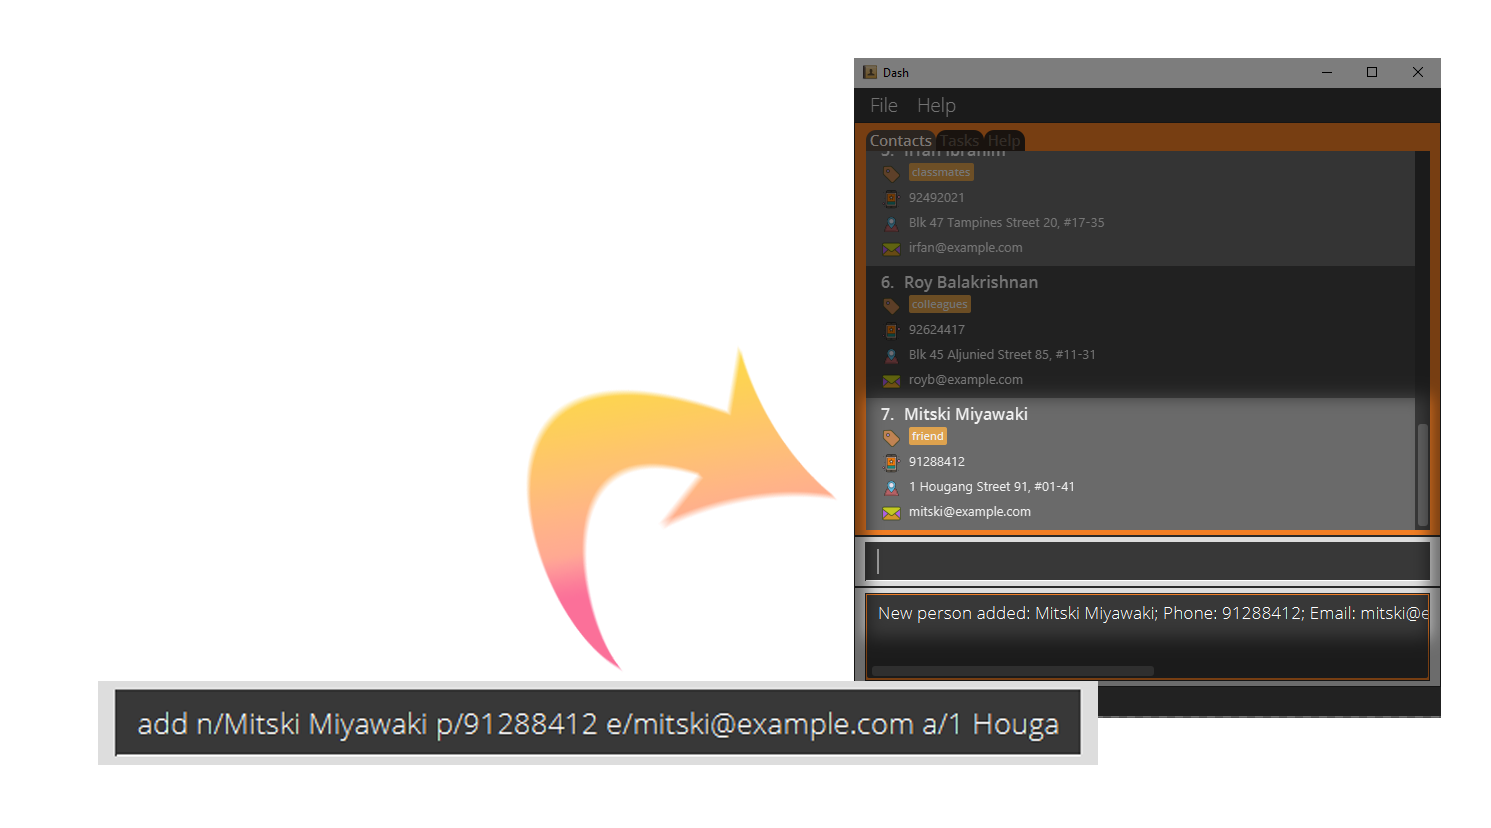
![]() If you want to add a person to the contact list, you can use the Add command. Only the contact’s name
is compulsory during creation.
If you want to add a person to the contact list, you can use the Add command. Only the contact’s name
is compulsory during creation.
![]() The above screenshot shows how you can use the Add command to add a person with the following details to
your contact list:
The above screenshot shows how you can use the Add command to add a person with the following details to
your contact list:
- Name: Mitski Miyawaki
- Phone number: 91288841
- Email address: mitski@example.com
- Address: 1 Hougang Street 91, #01-41
- Tag(s): friend
![]() Format:
Format: add n/NAME [p/PHONE_NUMBER] [e/EMAIL] [a/ADDRESS] [t/TAG]...
![]() Name limitations:
Name limitations:
Names must be unique, and should be no longer than 30 characters.
Editing contact details: edit
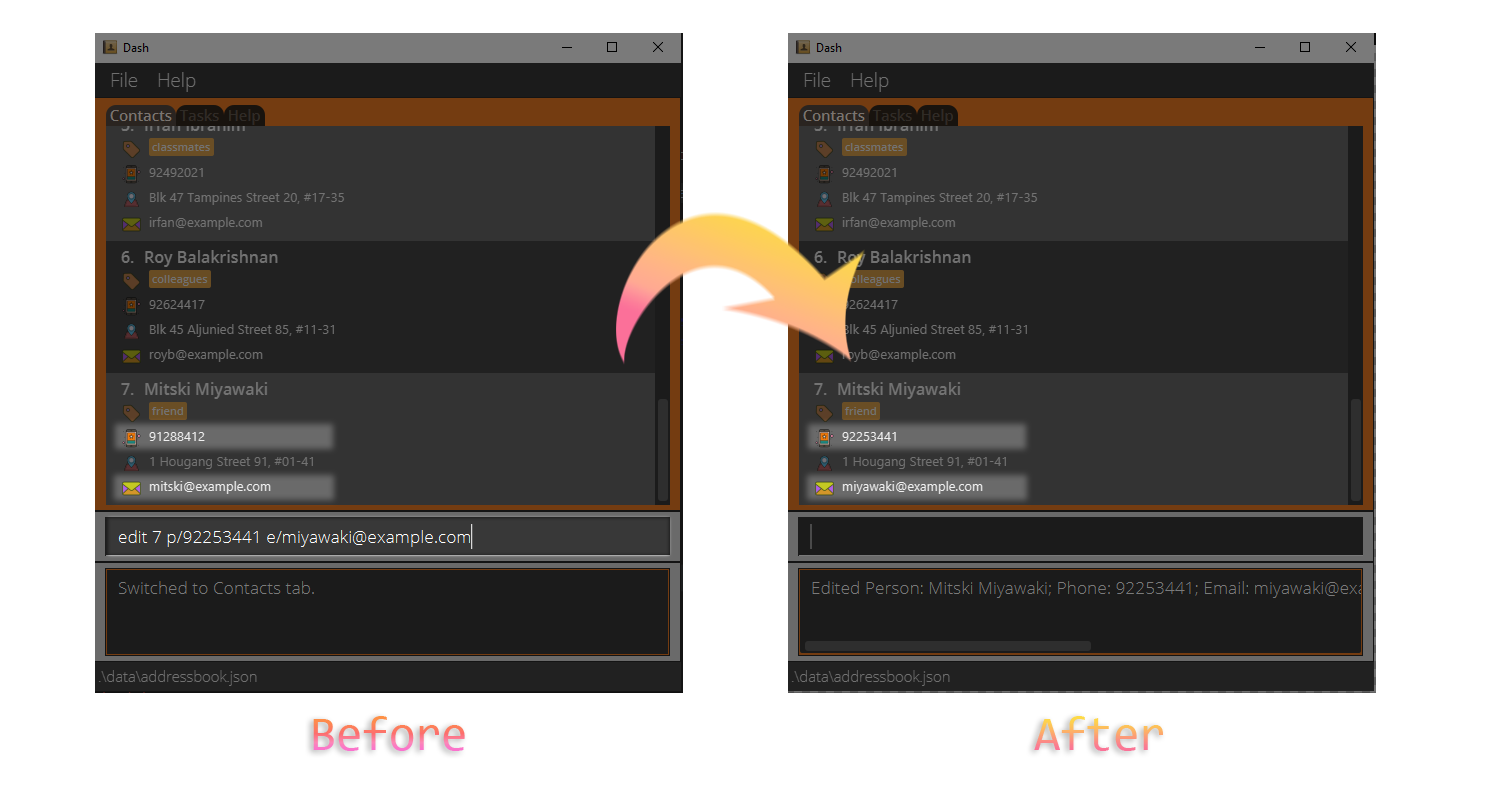
![]() If you want to modify the details of a specific contact, you can use the Edit command.
If you want to modify the details of a specific contact, you can use the Edit command.
![]() The above screenshot shows how the Edit command can be used to edit the phone number and email of a contact.
The above screenshot shows how the Edit command can be used to edit the phone number and email of a contact.
![]() Format:
Format: edit INDEX [n/NAME] [p/PHONE_NUMBER] [e/EMAIL] [a/ADDRESS] [t/TAG]...
![]() Notes:
Notes:
- At least one of the optional fields must be provided.
- Edits the contact at the specified
INDEX.- The
INDEXrefers to the position of the contact in the displayed contact list as indicated by the number next to their name. - The
INDEXmust be a positive integer (1, 2, 3,…).
- The
- Existing values will be updated to the input values.
- When editing tags, the existing tags of the contact will be removed i.e. adding of tags is not cumulative.
- To add tags without removing existing tags, refer to the Tag command in the next section.
![]() Name limitations:
Name limitations:
Names must be unique, and should be no longer than 30 characters.
![]() You can remove all tags from a contact by typing
You can remove all tags from a contact by typing edit INDEX t/.
Tagging a contact: tag
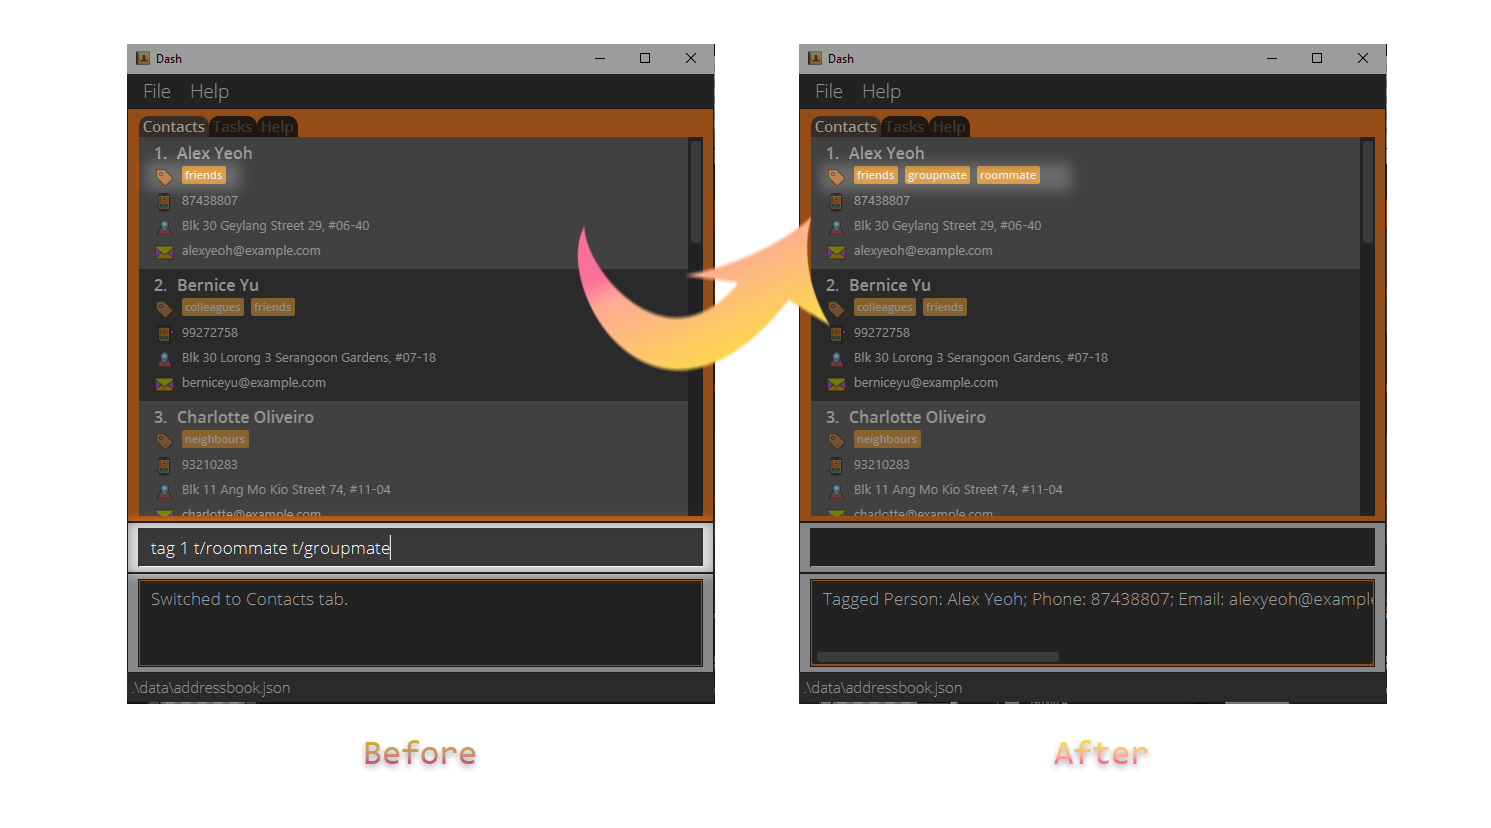
![]() If you want to add new tags to a contact without replacing the old ones, you can use the Tag command.
If you want to add new tags to a contact without replacing the old ones, you can use the Tag command.
![]() The above screenshot shows how the Tag command can be used to tag a contact with the tag “groupmate”.
The above screenshot shows how the Tag command can be used to tag a contact with the tag “groupmate”.
![]() Format:
Format: tag INDEX t/TAG...
![]() Notes:
Notes:
- At least one tag must be provided.
![]() Tag limitations:
Tag limitations:
Tags should be no longer than 15 characters.
Deleting a contact: delete
![]() If you want to delete a contact, you can use the Delete command.
If you want to delete a contact, you can use the Delete command.
![]() Format:
Format: delete INDEX
![]() Notes:
Notes:
- Deletes the person at the specified
INDEX.- The
INDEXrefers to the position of the contact in the displayed contact list as indicated by the number next to their name. - The
INDEXmust be a positive integer (1, 2, 3,…).
- The
Finding all contacts matching given details: find
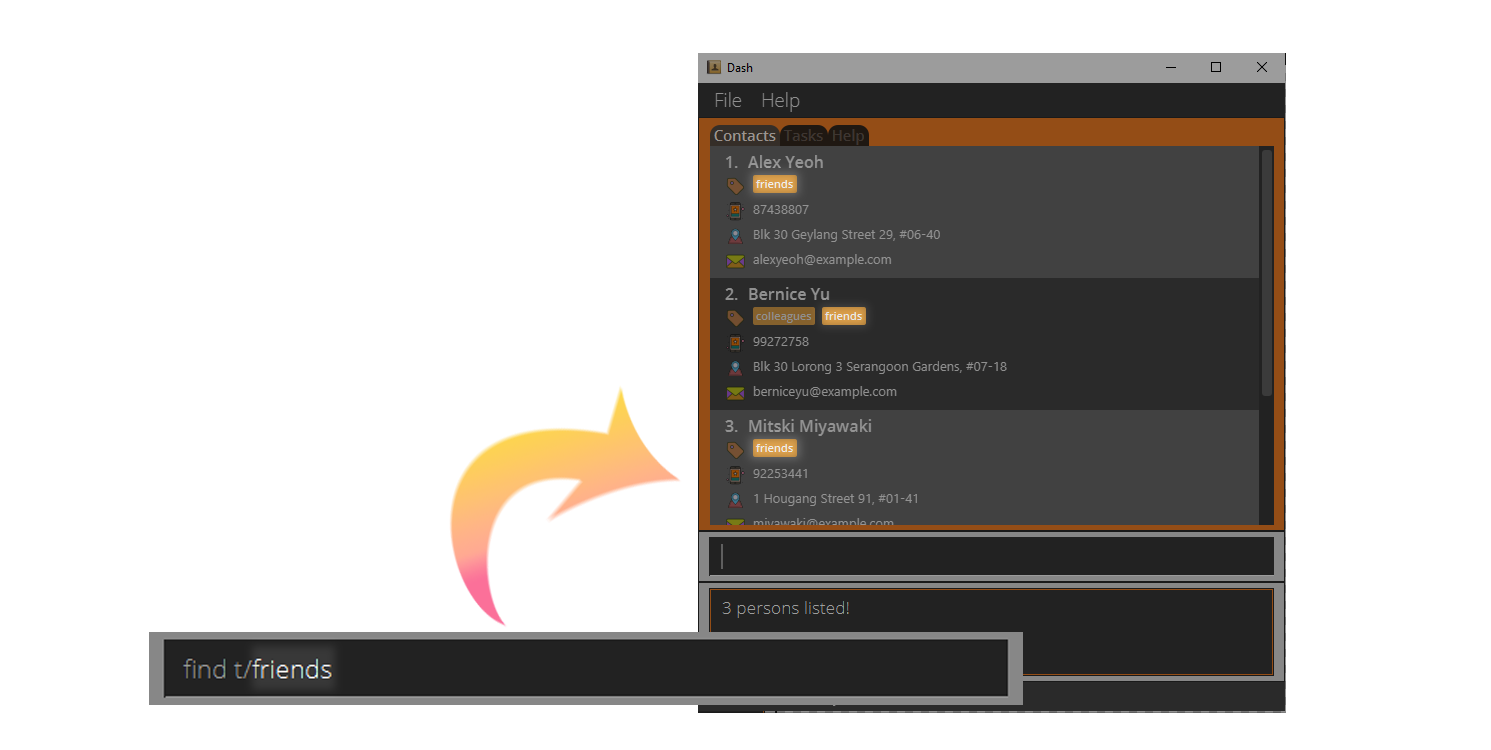
![]() If you want to filter your contacts by tags, names, or any other details, you can use the Find command.
If you want to filter your contacts by tags, names, or any other details, you can use the Find command.
![]() The above screenshot shows how the Find command can be used to search for all contacts who are tagged as
“friends”.
The above screenshot shows how the Find command can be used to search for all contacts who are tagged as
“friends”.
![]() Format:
Format: find [n/NAME] [p/PHONE_NUMBER] [e/EMAIL] [a/ADDRESS] [t/TAG]...
![]() Notes:
Notes:
- At least one of the optional fields must be provided.
- The search is case-insensitive. e.g.
find e/hans@gmail.comwill matchHans@gmail.com. - The order of the keywords does not matter. e.g.
find a/tampines 111will matchBlk 111 Tampines Street 11, #02-345. - Contacts matching all keywords will be returned (i.e. AND search).
- e.g.
find n/Hans Bowill return onlyHans BoandHans Bo the Second. It will not returnHans GruberorBo Yang. - e.g.
find p/86235343 t/CS2101will return only contacts who have both the phone number86235343AND the tagCS2101. It will not return contacts with different phone numbers, even if they both have the tagCS2101.
- e.g.
![]() For added convenience, you can find contacts by their names by typing just
For added convenience, you can find contacts by their names by typing just find NAME without the prefix n/.
Listing all contacts: list
![]() After you’ve filtered your contacts using
the Find command, if you want to view all of them again, you can
use the List command.
After you’ve filtered your contacts using
the Find command, if you want to view all of them again, you can
use the List command.
![]() Format:
Format: list
Clearing all contacts: clear
![]() If you want to delete all of your contacts, you can use the Clear command.
If you want to delete all of your contacts, you can use the Clear command.
![]() Format:
Format: clear
![]() Clearing all contacts:
Clearing all contacts:
This command is irreversible and your contact list will be permanently deleted.
Tasks
![]() Command behaviour:
Make sure you switch to the Tasks tab before using these commands! They will not work otherwise.
Command behaviour:
Make sure you switch to the Tasks tab before using these commands! They will not work otherwise.
![]() Notes on the Contacts panel:
On the Tasks tab, there is a Contacts panel on the right that shows a simplified view of your Contacts tab. If you
filtered your contacts by using the Find command before switching to the Tasks tab, the Contacts panel shows the same
filtered contact list. In this way, if you have a lot of contacts, you can maintain a focused view of the current people
of interest and more easily assign them to tasks.
Notes on the Contacts panel:
On the Tasks tab, there is a Contacts panel on the right that shows a simplified view of your Contacts tab. If you
filtered your contacts by using the Find command before switching to the Tasks tab, the Contacts panel shows the same
filtered contact list. In this way, if you have a lot of contacts, you can maintain a focused view of the current people
of interest and more easily assign them to tasks.
Adding a task: add
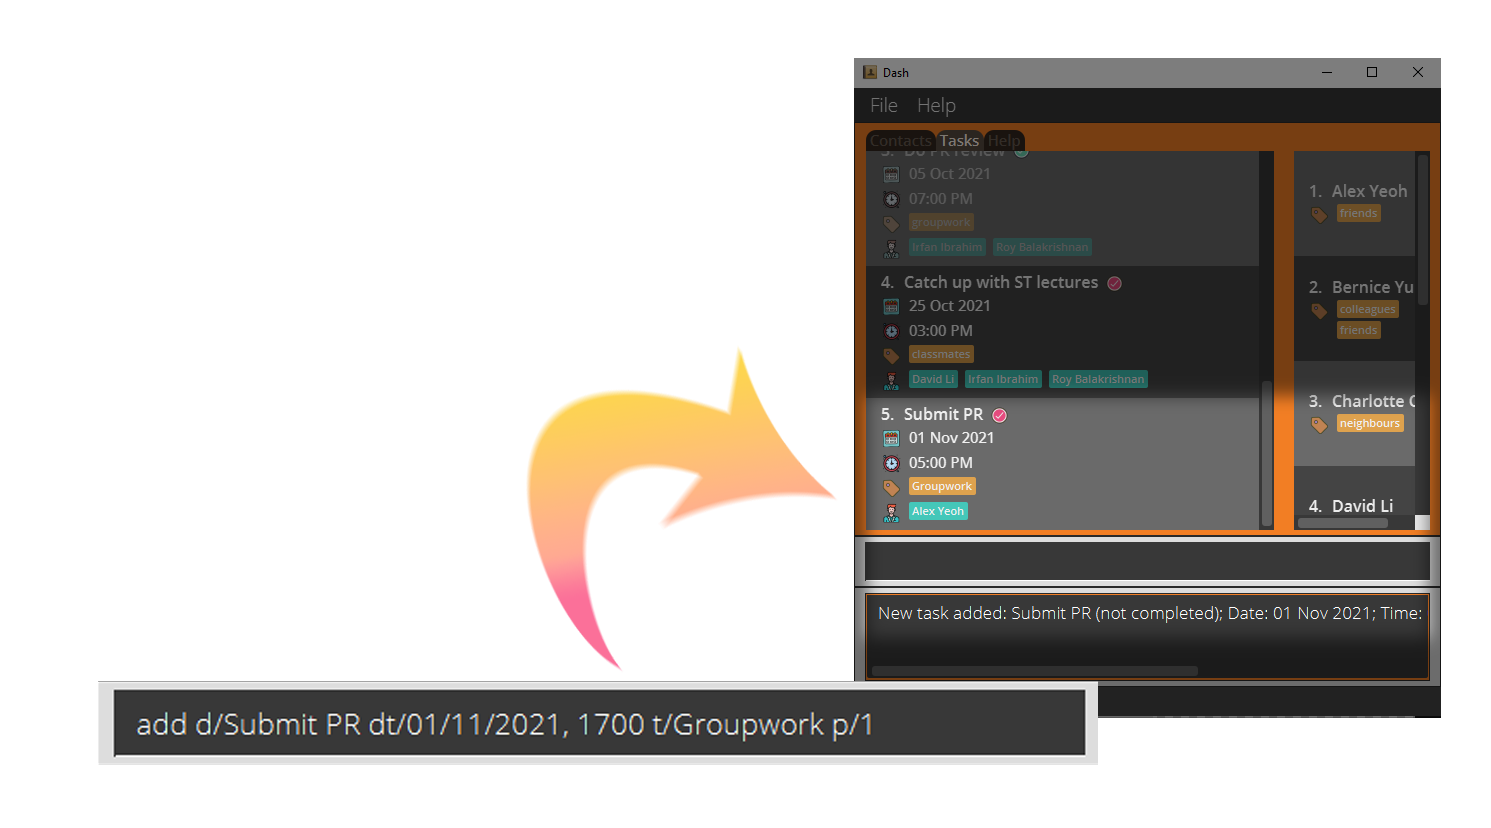
![]() If you want to add a task to the task list, you can use the Add command. Only task’s description is
compulsory during creation.
If you want to add a task to the task list, you can use the Add command. Only task’s description is
compulsory during creation.
![]() The above screenshot shows how you can use the Add command to add a task with the following details to your
task list:
The above screenshot shows how you can use the Add command to add a task with the following details to your
task list:
- Description: Submit PR
- Date and Time: 1 Nov 2021, 5:00 PM
- Tag(s): Groupwork
- Assigned Person(s): Alex Yeoh
![]() Format:
Format: add d/DESCRIPTION [dt/DATE] [dt/TIME] [dt/DATE, TIME] [p/PERSON_INDEX]... [t/TAG]...
![]() Notes:
Notes:
- If you want to assign people to the task, the people to be assigned to the task (assignees) are specified with
PERSON_INDEX.- You can assign multiple people to the same task at once.
- The
PERSON_INDEXrefers to the position of the person in the Contacts panel as indicated by the number next to their name. - Any specified
PERSON_INDEXmust be a positive integer (1, 2, 3,…).
- An explanation of how Date and Time formats work can be found here.
Editing task details: edit
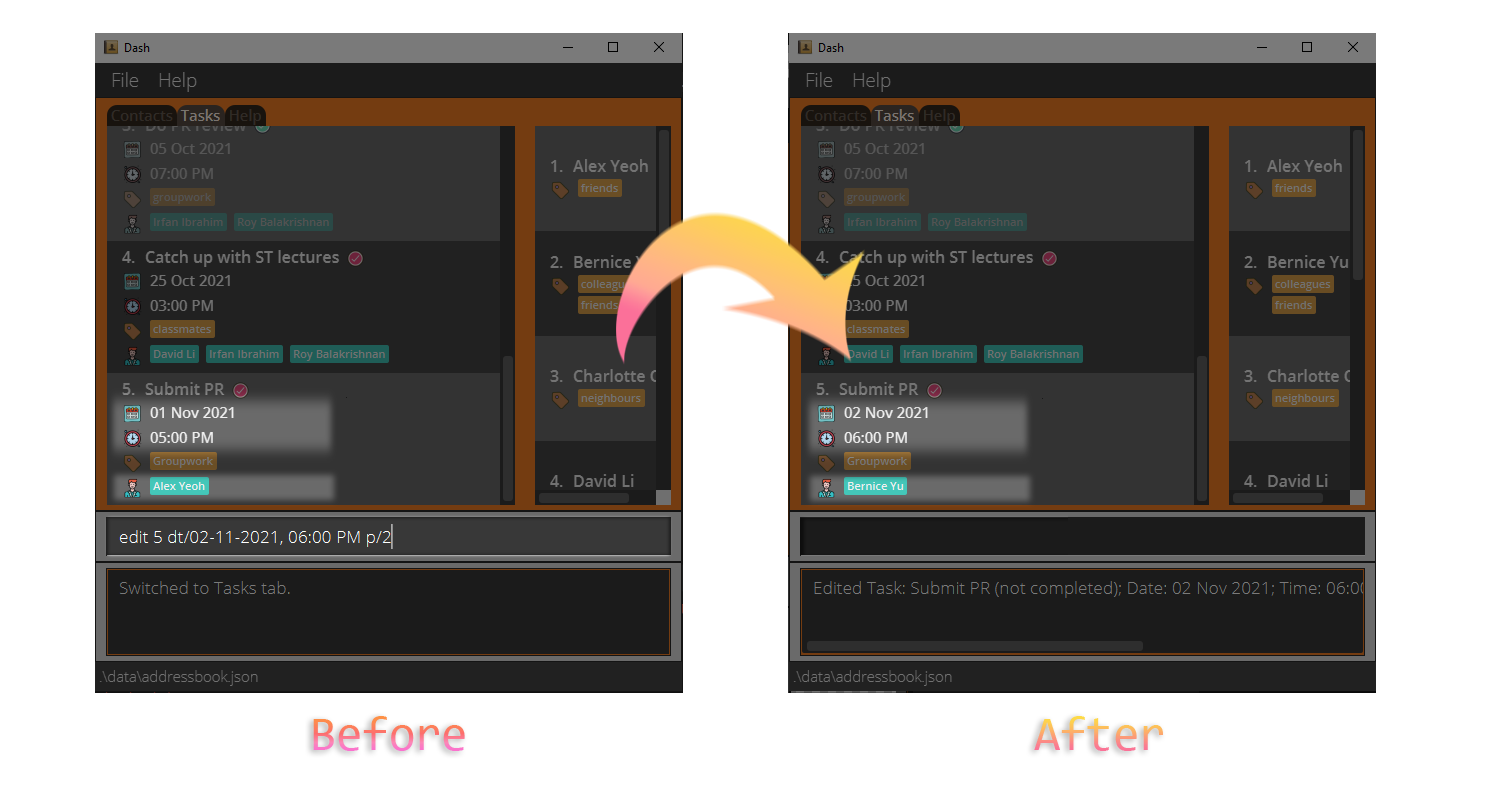
![]() If you want to modify the details of a specific task, you can use the Edit command.
If you want to modify the details of a specific task, you can use the Edit command.
![]() The above screenshot shows how the Edit command can be used to edit the Date, Time and assignee of a task.
The above screenshot shows how the Edit command can be used to edit the Date, Time and assignee of a task.
![]() Format:
Format: edit INDEX [d/DESCRIPTION] [dt/DATE] [dt/TIME] [dt/DATE, TIME] [p/PERSON_INDEX]... [t/TAG]...
![]() Notes:
Notes:
- At least one of the optional fields must be provided.
- Edits the task at the specified
INDEX.- The
INDEXrefers to the position of the task in the displayed task list as indicated by the number next to its description. - The
INDEXmust be a positive integer (1, 2, 3,…).
- The
- Existing values will be updated to the input values.
- When editing tags, the existing tags of the contact will be removed i.e. adding of tags is not cumulative.
- To add tags without removing existing tags, refer to the Tag command in the next section.
- If you want to modify the assignees of the task, new assignees are specified with
PERSON_INDEX.- You can assign multiple people to the same task at once.
- The
PERSON_INDEXrefers to the position of the person in the Contacts panel as indicated by the number next to their name. - Any specified
PERSON_INDEXmust be a positive integer (1, 2, 3,…).
- An explanation of how Date and Time formats work can be found here.
![]() You can remove all tags from a task by typing
You can remove all tags from a task by typing edit INDEX t/.
Tagging a task: tag
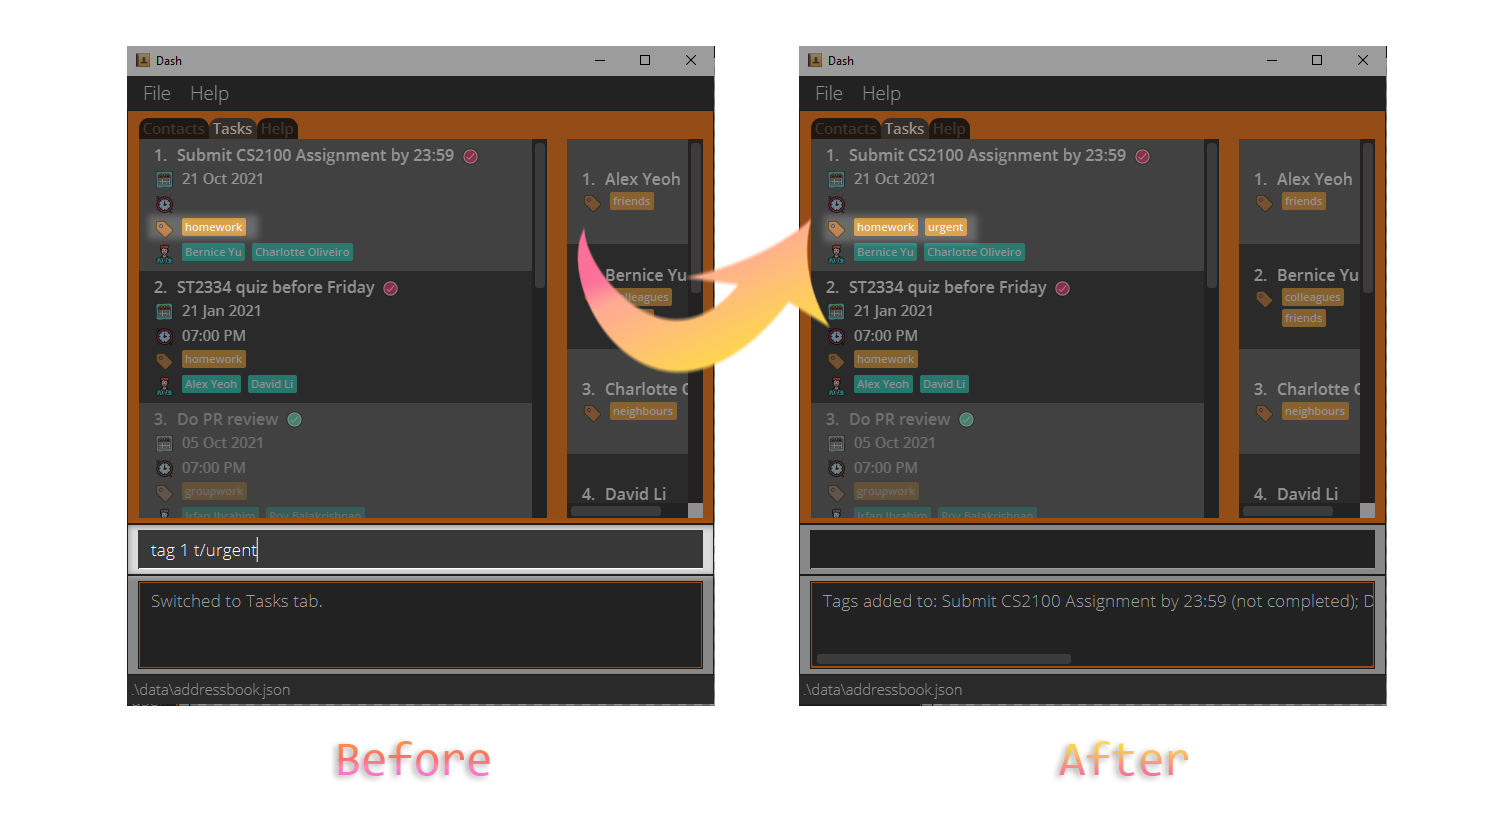
![]() If you want to add more tags to a task without replacing the old tags, you can use the Tag command.
If you want to add more tags to a task without replacing the old tags, you can use the Tag command.
![]() The above screenshot shows how the Tag command is used to add the tag “urgent” to the task “Submit CS2100 Assignment
by 23:59”.
The above screenshot shows how the Tag command is used to add the tag “urgent” to the task “Submit CS2100 Assignment
by 23:59”.
![]() Format:
Format: tag INDEX t/TAG...
![]() Notes:
Notes:
- At least one tag must be provided.
![]() Tag Limitations:
Tag Limitations:
Tags should be no longer than 15 characters.
Assigning people to a task: assign
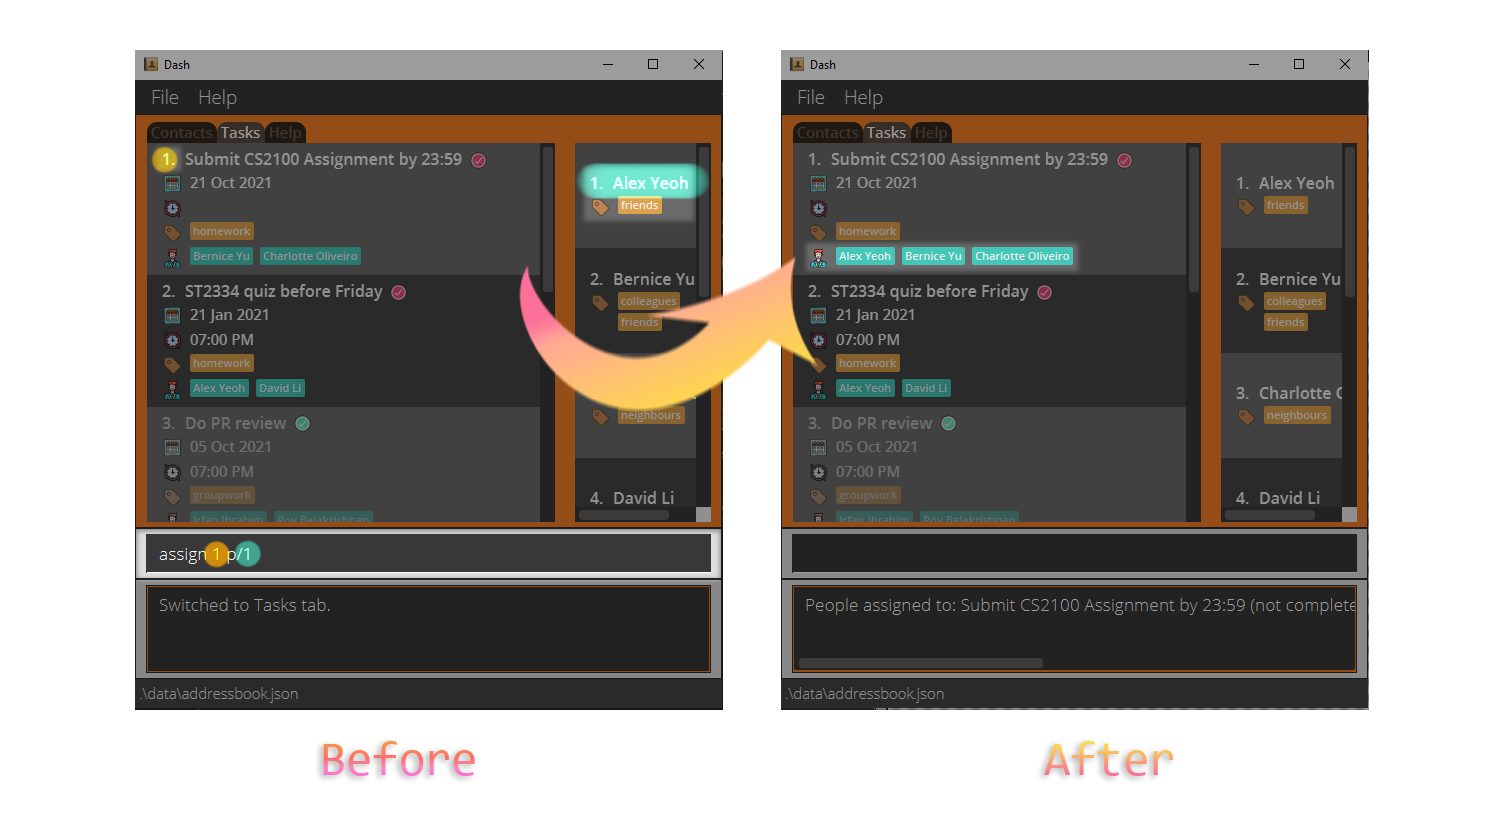
![]() If you want to assign more people to a task without replacing the old assignees, you can use the Assign
command.
If you want to assign more people to a task without replacing the old assignees, you can use the Assign
command.
![]() The above screenshot shows how the Assign command is used to assign “Alex Yeoh” to the task “Submit CS2100 Assignment
by 23:59”.
The above screenshot shows how the Assign command is used to assign “Alex Yeoh” to the task “Submit CS2100 Assignment
by 23:59”.
![]() Format:
Format: assign INDEX p/PERSON_INDEX...
![]() Notes:
Notes:
- Assigns people, specified with
PERSON_INDEX, to the task at the specifiedINDEX.- At least one person must be provided.
- You can assign multiple people to the same task at once.
- The
INDEXrefers to the position of the task in the displayed task list as indicated by the number next to its description. - The
PERSON_INDEXrefers to the position of the person in the Contacts panel as indicated by the number next to their name. - The
INDEXandPERSON_INDEXmust be positive integers (1, 2, 3,…).
Completing a task: complete
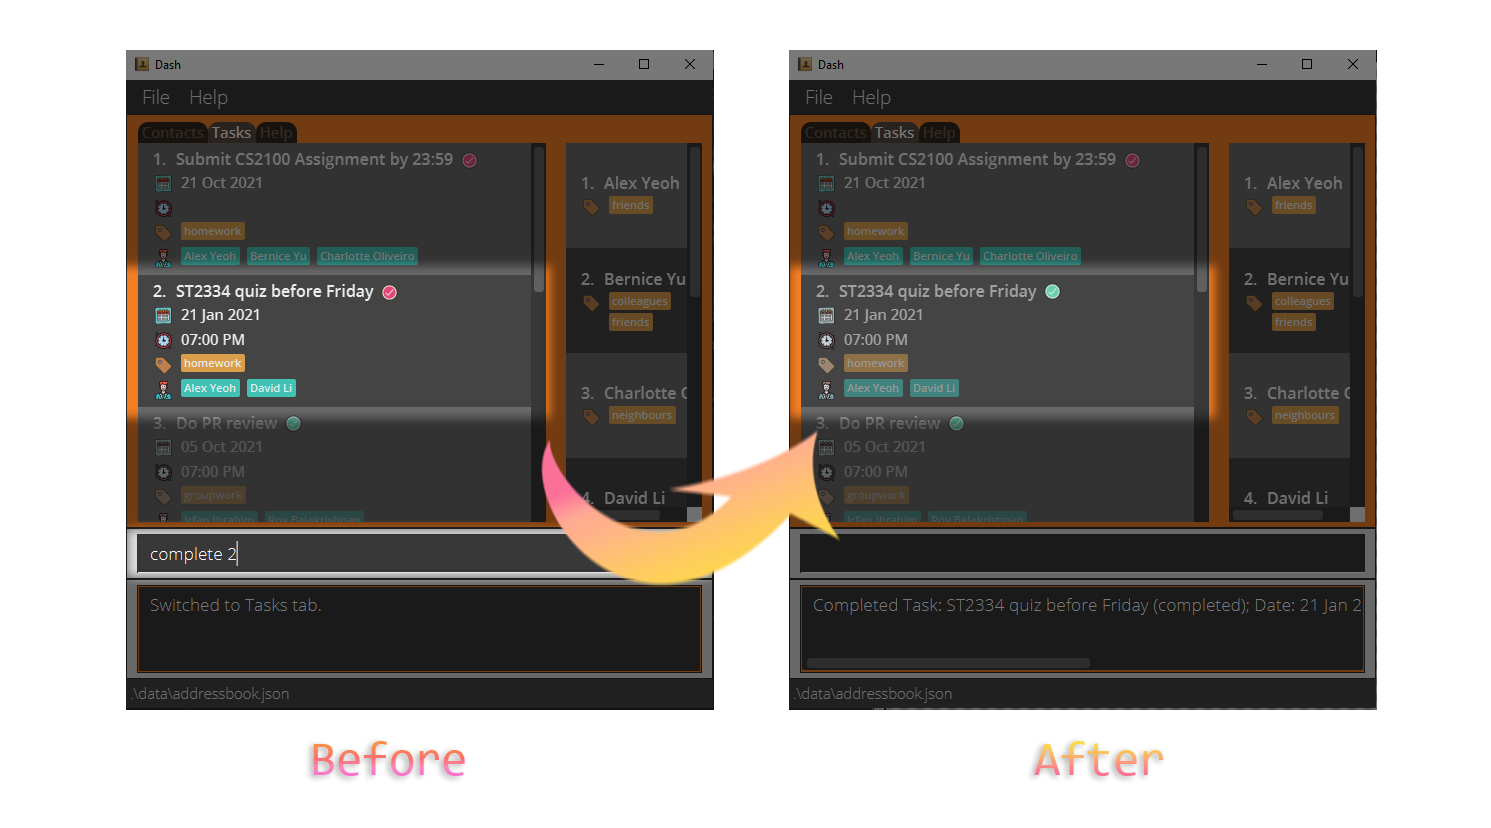
![]() If you have completed a task, you can mark it as completed by using the Complete command.
If you have completed a task, you can mark it as completed by using the Complete command.
![]() The above screenshot shows how a completed task has its text greyed out and has a green tick next to its description.
An incomplete task has a red tick instead.
The above screenshot shows how a completed task has its text greyed out and has a green tick next to its description.
An incomplete task has a red tick instead.
![]() Format:
Format: complete INDEX
![]() Notes:
Notes:
- Completes the task at the specified
INDEX.- The
INDEXrefers to the position of the task in the displayed task list as indicated by the number next to its description. - The
INDEXmust be a positive integer (1, 2, 3,…).
- The
- You cannot ‘un-complete’ a task.
Deleting a task: delete
![]() If you want to delete a task, you can use the Delete command.
If you want to delete a task, you can use the Delete command.
![]() Format:
Format: delete INDEX
![]() Notes:
Notes:
- Deletes the task at the specified
INDEX.- The
INDEXrefers to the position of the task in the displayed task list as indicated by the number next to its description. - The
INDEXmust be a positive integer (1, 2, 3,…).
- The
Finding all tasks matching given details: find
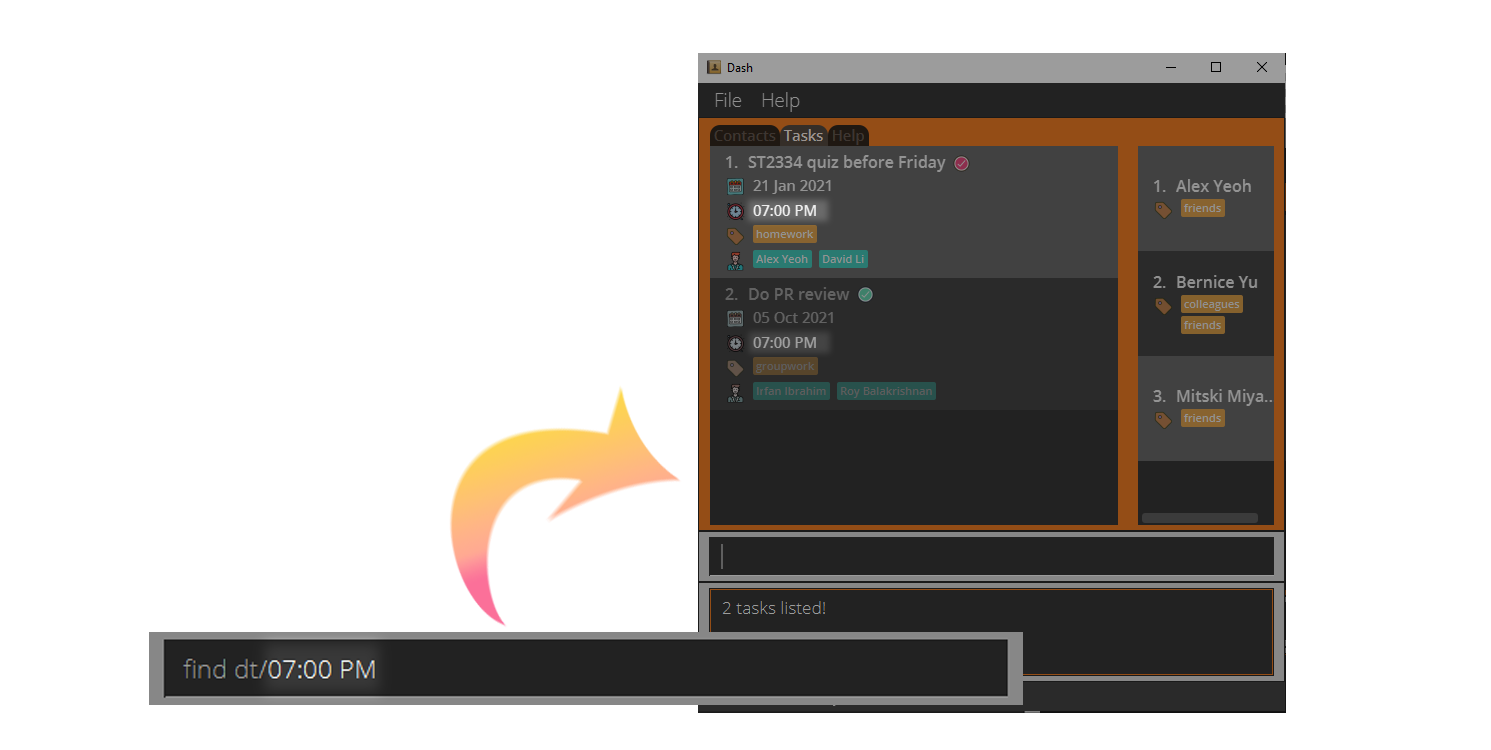
![]() If you want to filter your tasks by tags, assigned people, or any other details,
you can use the Find command.
If you want to filter your tasks by tags, assigned people, or any other details,
you can use the Find command.
![]() The above screenshot shows how the Find command can be used to search for all tasks marked “07:00 PM”.
The above screenshot shows how the Find command can be used to search for all tasks marked “07:00 PM”.
![]() Format:
Format: find [d/DESCRIPTION] [dt/DATE] [dt/TIME] [dt/DATE, TIME] [c/COMPLETION_STATUS]
[p/PERSON_INDEX]... [t/TAG]...
![]() Notes:
Notes:
- At least one of the optional fields must be provided.
- The search is case-insensitive. e.g
find t/HOMEWORKwill match thehomeworktag. - The order of the keywords does not matter. e.g.
find d/lectures STwill matchST Lectures. -
COMPLETION_STATUSmust be eithertrue(for completed tasks) orfalse(for incomplete tasks). - Tasks matching all keywords will be returned (i.e. AND search).
- e.g.
find d/Math Quizwill return onlyMath QuizandMath Quiz 8. It will not returnMath AssignmentorGEQ Quiz. - e.g.
find dt/1900 t/homeworkwill return only tasks which have both the time1900AND the taghomework. It will not return tasks with different times, even if they both have the taghomework.
- e.g.
- An explanation of how Date and Time formats work can be found here.
![]() For added convenience, you can find tasks by their descriptions by typing just
For added convenience, you can find tasks by their descriptions by typing just find DESCRIPTION
without the prefix d/.
Viewing all upcoming tasks: upcoming
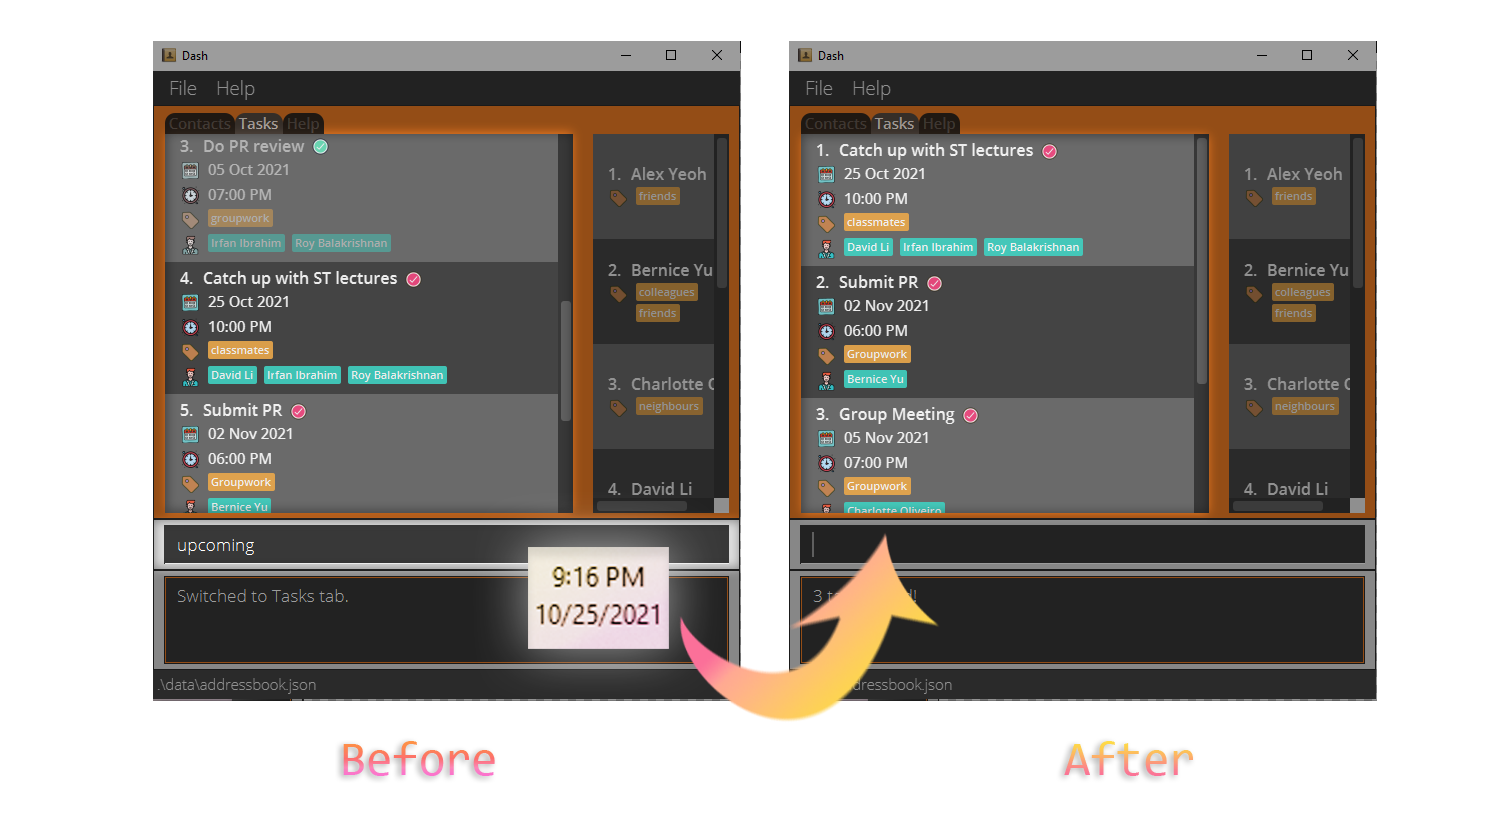
![]() If you want to view all of your upcoming tasks, you can use the Upcoming command. Upcoming tasks are
incomplete tasks whose Date/Time are after the current Date/Time.
If you want to view all of your upcoming tasks, you can use the Upcoming command. Upcoming tasks are
incomplete tasks whose Date/Time are after the current Date/Time.
![]() The above screenshot shows how the Upcoming command is used to view all incomplete tasks after the current
Date/Time. In this example, it was 25 October 2021, 09:16 PM.
The above screenshot shows how the Upcoming command is used to view all incomplete tasks after the current
Date/Time. In this example, it was 25 October 2021, 09:16 PM.
![]() Format:
Format: upcoming
![]() Notes:
Notes:
- Filters your task list so that upcoming tasks will be listed in chronological order.
- The current Date/Time is determined locally by your system clock.
![]() This command will reorder your task list, even after you remove the filter with
the List command.
Completed tasks will appear first, so it’s convenient to use
the Cleardone command next!
This command will reorder your task list, even after you remove the filter with
the List command.
Completed tasks will appear first, so it’s convenient to use
the Cleardone command next!
Listing all tasks: list
![]() After you’ve filtered your tasks using
the Find command or
the Upcoming command, if you want to view all of them again, you can
use the List command.
After you’ve filtered your tasks using
the Find command or
the Upcoming command, if you want to view all of them again, you can
use the List command.
![]() Format:
Format: list
Clearing completed tasks: cleardone
![]() If you want to delete all of your completed tasks, you can use the Cleardone command.
If you want to delete all of your completed tasks, you can use the Cleardone command.
![]() Format:
Format: cleardone
Clearing all tasks: clear
![]() If you want to delete all of your tasks, you can use the Clear command.
If you want to delete all of your tasks, you can use the Clear command.
![]() Format:
Format: clear
![]() Clearing all tasks:
Clearing all tasks:
This command is irreversible and your task list will be permanently deleted.
![]() Notes about specifying Date and Time:
A task can optionally have a Date, or both a Date and a Time.
Notes about specifying Date and Time:
A task can optionally have a Date, or both a Date and a Time.
add [dt/DATE] [dt/TIME] [dt/DATE, TIME]
- When only Date is specified in the Add command, a task will only have the specified Date.
- When only Time is specified in the Add command, a task will have today’s Date and the specified Time.
- When both Date and Time are specified in the Add command, a task will have both of the specified Date and Time.
edit [dt/DATE] [dt/TIME] [dt/DATE, TIME]
- When only Date is specified in the Edit command, a task will only have its Date changed to the specified Date.
- When only Time is specified in the Edit command, a task will only have its Time changed to the specified Time.
- When both Date and Time are specified in the Edit command, a task will have both of its Date and Time changed to the specified Date and Time.
![]() Multiple Date/Time parameters:
Multiple Date/Time parameters:
All commands that accept Date/Time parameters (Add, Edit, Find commands) expect only one Date/Time parameter.
If you specify multiple Date/Time parameters, only the last Date/Time parameter will be taken.
e.g. if you specify dt/12/02/2021 dt/1900, only dt/1900 will be taken.
Date Formats
| Format | Example |
|---|---|
| dd/MM/yyyy | 02/10/2021 |
| dd-MM-yyyy | 02-10-2021 |
| yyyy/MM/dd | 2021/10/02 |
| yyyy-MM-dd | 2021-10-02 |
| dd MMM yyyy |
02 Oct 2021 (First letter of Month must be capitalised) |
Time Formats
| Format | Example |
|---|---|
| HHmm |
1300 (01:00 PM in 24-hour notation) |
| hh:mm a |
10:00 PM, 02:00 AM (AM and PM must be capitalised) |
Command summary
General
| Action | Format |
|---|---|
| Contacts |
contacts or c
|
| Tasks |
tasks or t
|
| Help |
help or h
|
| Exit | exit |
Contact Tab
| Action | Format |
|---|---|
| Add | add n/NAME [p/PHONE_NUMBER] [e/EMAIL] [a/ADDRESS] [t/TAG]... |
| Edit | edit INDEX [n/NAME] [p/PHONE_NUMBER] [e/EMAIL] [a/ADDRESS] [t/TAG]... |
| Tag | tag INDEX t/TAG... |
| Delete | delete INDEX |
| Find | find [n/NAME] [p/PHONE_NUMBER] [e/EMAIL] [a/ADDRESS] [t/TAG]... |
| List | list |
| Clear | clear |
Tasks Tab
| Action | Format |
|---|---|
| Add | add d/DESCRIPTION [dt/DATE] [dt/TIME] [dt/DATE, TIME] [p/PERSON_INDEX]... [t/TAG]... |
| Edit | edit INDEX [d/DESCRIPTION] [dt/DATE] [dt/TIME] [dt/DATE, TIME] [p/PERSON_INDEX]... [t/TAG]... |
| Tag | tag INDEX t/TAG... |
| Assign | assign INDEX p/PERSON_INDEX... |
| Complete | complete INDEX |
| Delete | delete INDEX |
| Find | find [d/DESCRIPTION] [dt/DATE] [dt/TIME] [dt/DATE, TIME] [c/COMPLETION_STATUS] [p/PERSON_INDEX]... [t/TAG]... |
| Upcoming | upcoming |
| List | list |
| Clear Done | cleardone |
| Clear | clear |